
 Contents
Revenue Sharing
Revenue Sharing is a unique concept where system runs a program and distributes the revenue generated to members who have purchased shares in the system. There are multiple features in this module which you can check out in our demo at http://demo.proxcore.com/. Go through the instructions below on how to work with this module.
- Login to your "proxscripts.com" account
- Go to the "Downloads" page
- Click on the "More..." Button of the script you wish to download
- You will find the "License Key" for module 3 in the Modules box
- Click on "Download Now" to download your script
- "Unzip" downloaded script and upload all files present in the folder named =>"module3=>upload" :
- Next, connect your “FTP” to your “webhost account”. Upload all the files in the folder named “upload” mentioned in first step to “public_html/app" directory.
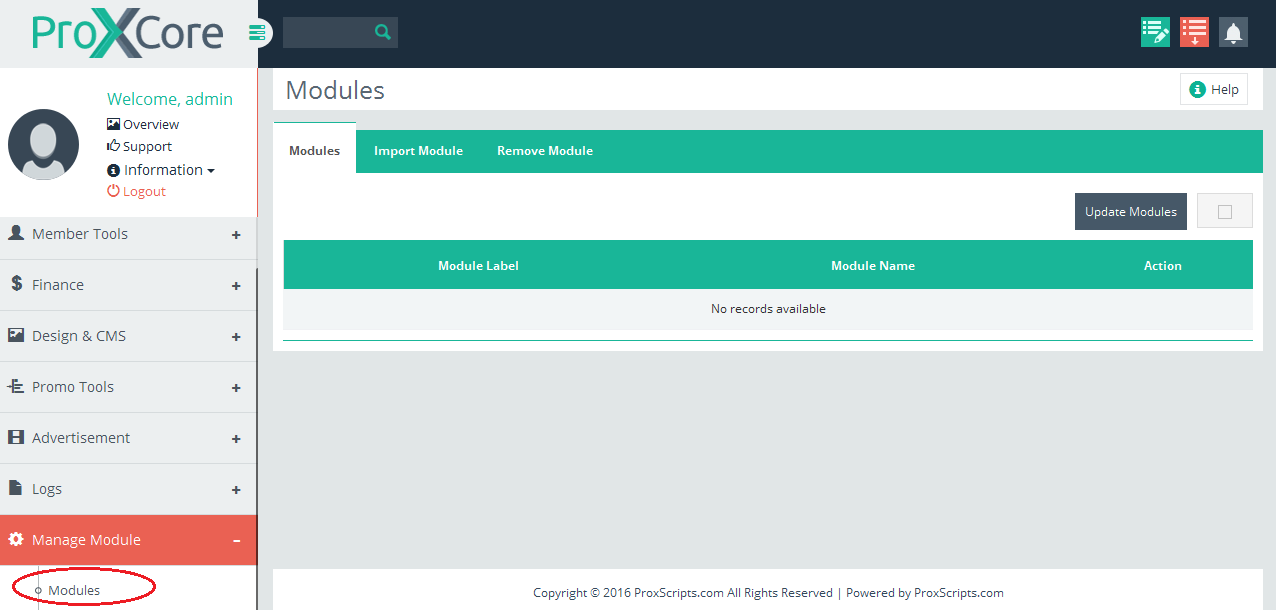
- Next, go to the admin area of your script.
- Go to Manage Modules => Modules
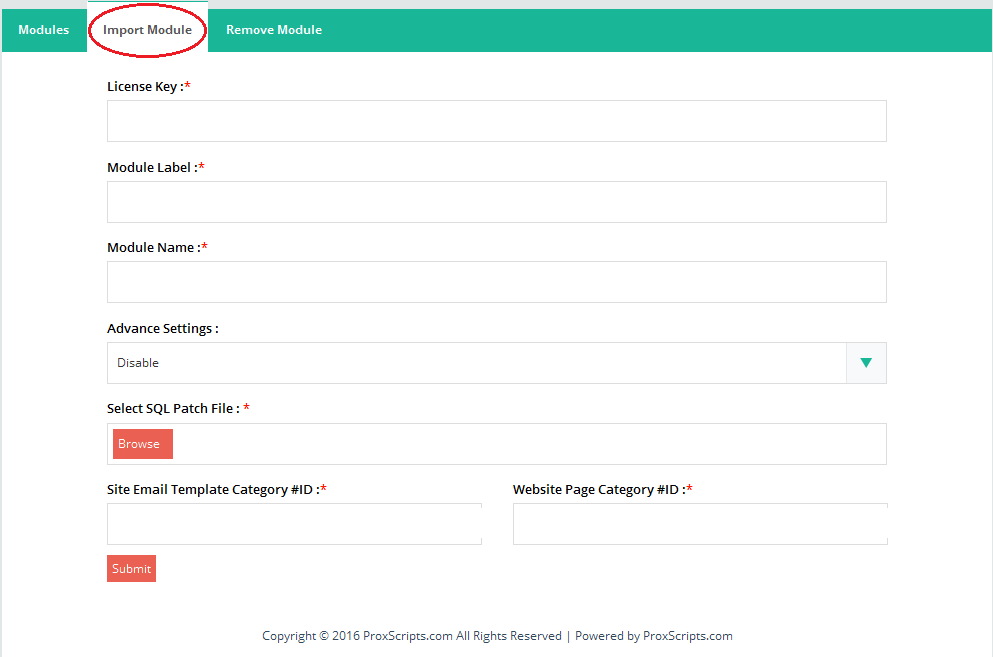
- Click on the "Import Module" tab and fill in the relevant fields, which are as follows :
- License Key :* - Specify the license key here. This is a mandatory field and you will find it from the steps given above.
- Module Label :* - Specify the module label here for your reference. You can set whatever you want in this field. For example: Revenue Sharing Plan, Revenue Sharing System etc. The Module Label will be the name of your module which will be displayed in the Menu when it will be added to your script.
- Module Name :* - module3 (Don't change this. You need to enter it exactly the way it is written)
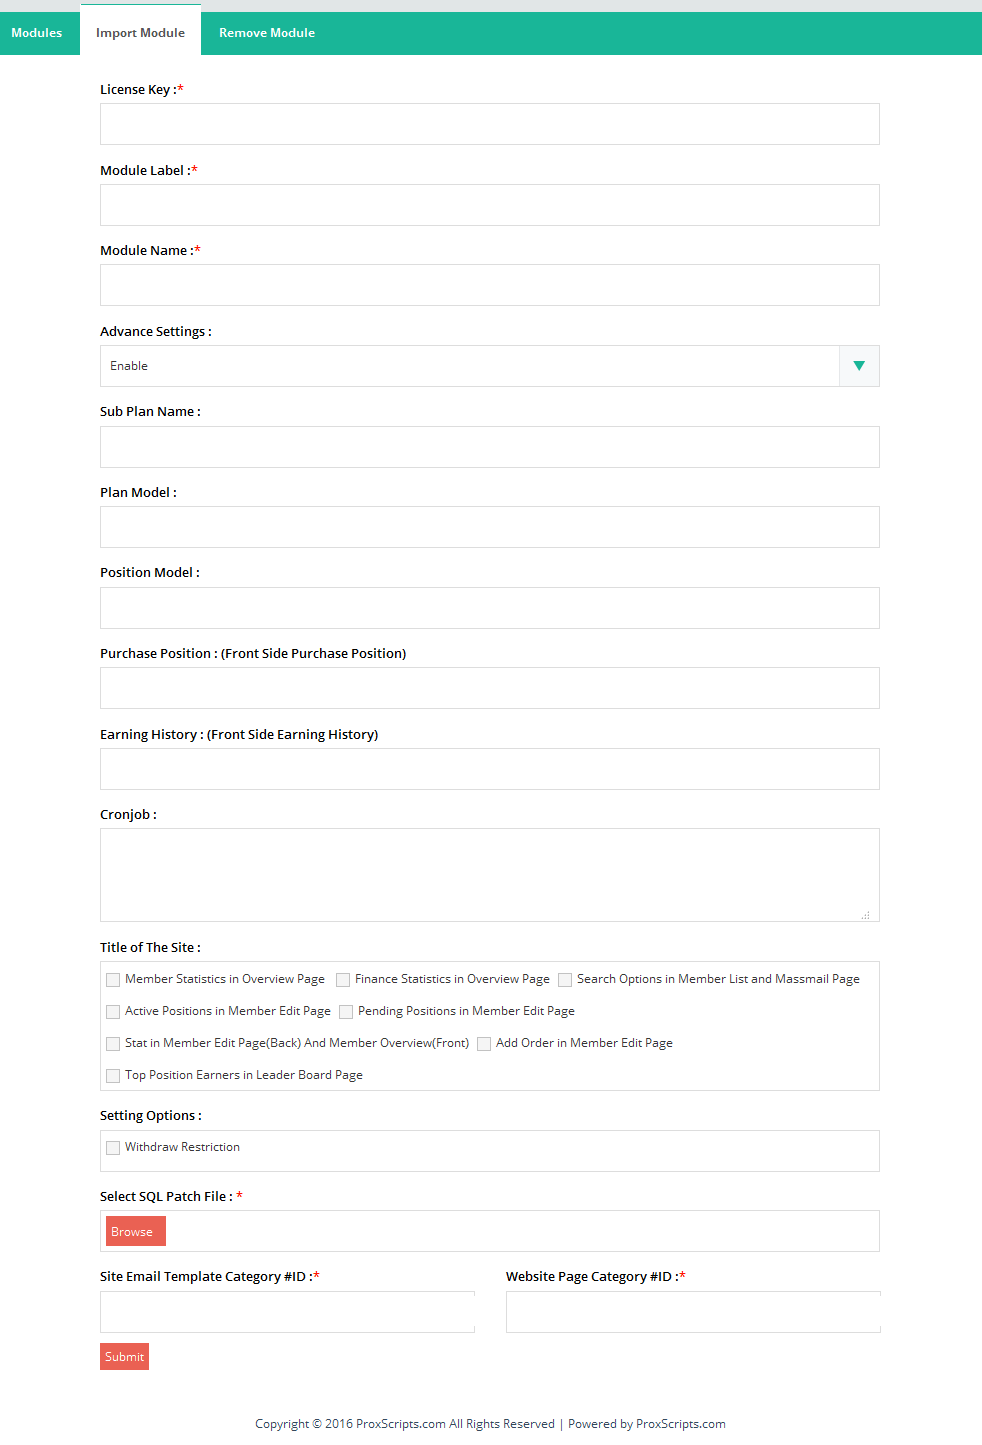
- Advance Settings : - Enable (Enable the advance settings. Don't disable them)
- Sub Plan Name : - Revenue (Don't change this. You need to enter it exactly the way it is written. Make sure that “R” is in capital)
- Plan Model : - Revenueplan (Don't change this. You need to enter it exactly the way it is written. Make sure that “R” is in capital)
- Position Model : - Revenueposition (Don't change this. You need to enter it exactly the way it is written. Make sure that “R” is in capital)
- Purchase Position : - (Front Side Purchase Position) - index (Don't change this. You need to enter it exactly the way it is written)
- Earning History : - (Front Side Earning History) - position (Don't change this. You need to enter it exactly the way it is written)
- Cronjob : - regular;advanced;revenuemail (Don't change this. You need to enter it exactly the way it is written)
- Title of The Site : - Select the areas where you wish to display the options/statistics of this module. You can check all the places or the ones you want.
- Setting Options : - Select the checkbox for Withdraw Restriction. It is mandatory to check this box.
- Select SQL Patch File :* - Click on browse and add the SQL file (patch.xml) provided with the module here.You will find this in the module3 folder.
- Site Email Template Category #ID :* - You have to setup a new Email Template first of all and after it is setup, you need to enter the ID of the Site Email Template here. Please follow the steps mentioned below on how to setup a new Email Template and get the #ID:
- Go to Design & CMS => Email Templates => Site Email Template Categories tab
- Click on “Add New”
- Name: Enter the Name of Site Email Template Category
- Click on “Submit”
- Click on “Back” to go back to Site Email Template Categories
- In the Site Email Template Categories page you will find the email category you have created and on the left hand site you will find the Id.
- Copy the #ID and enter it in the Site Email Template Category #ID :* field
The use of Site Email Template Category is to add particular module’s email templates.
- Website Page Category #ID :* - You have to setup a new Website Page Category first of all and after it is setup, you need to enter the ID of the Website Page Category here. Please follow the steps mentioned below on how to setup a new Website Page Category and get the #ID:
- Go to Design & CMS => Website Pages => Website Page Categories tab
- Click on “Add New”
- Name: Enter the Name of Website Page Category
- Click on “Submit”
- Click on “Back” to go back to Site Website Page Categories
- In the Site Website Page Categories page you will find the Website Page category you have created and on the left hand site you will find the Id.
- Copy the #ID and enter it in the Website Page Category #ID :* field
The use of Website Page Template Category is to add particular module’s website page templates.
- Click on the "Submit" button to apply the changes.
Please make sure that you enter all the mandatory fields mentioned in ‘*’ and after that only click on “Submit” otherwise you will have to repeat the entire process again.
Note : After module installation, you will need to clean the cache from your server. You can delete the cache from the following three directories:
- app/tmp/cache
- app/tmp/cache/models
- app/tmp/cache/persistent
Once the cache will be deleted from the server, then refresh the page.
- Revenue Earning Hourly Plans
Provides earnings to members of revenue earning plans that are providing earnings every 'n' hours. Not needed if you do not intend to use these type of plans.You have to set up either cronjob a) or b) according to your plan.
a) Timing : Once an Hour (0 * * * *)
Whether to set cronjob a) depends on what you have selected for the below mentioned fields while adding your Revenue Sharing Pay Plan from the following menu: Revenue Sharing Module => Revenue Plans => “Add New”.
If you have set the following fields to the corresponding values given, then you need to set cronjob a):
Maturity Amount : Regular
Earning Credit Strategy : "Instantly"
Supplementary Plan : No
Path : php -q /home/[USERNAME]/public_html/app/Console/cake.php revenuenull -app /home/[USERNAME]/public_html/app
b) Timing : Once an Hour (0 * * * *)
Whether to set cronjob b) depends on what you have selected for the below mentioned fields while adding your Revenue Sharing Pay Plan from the following menu: Revenue Sharing Module => Revenue Plans => “Add New”.
If you have set the following fields to the corresponding values given, then you need to set cronjob b):
Earning Credit Strategy : "Every ‘n’ Days" or "On Position Completion"
Maturity Amount : Membership Plan
Supplementary Plan : Yes
Path : php -q /home/[USERNAME]/public_html/app/Console/cake.php revenue -app /home/[USERNAME]/public_html/app
Note:
The cronjob timing is recommended one hour, but not less than one hour. If you keep the cronjob timing less than one hour, then there chances that the cronjob may not complete running and new cronjob starts running and due to this the system can crash. So, it is highly recommended to keep the cronjob timing to minimum one hour and not less than one hour.
If you feel that your site is slow and database is increasing and if your cronjob is not working, then it is better to set it at every 2 hours or 3 hours and so on. But, not less than one hour.
If you want to keep the timing less than one hour, then you can set it, but at your own risk.
- Mails (mandatory)
Provides all member will receive notification email regarding their revenue earning as per cronjob setup.
Timing : Twice a Day (0 0,12 * * *)
Path : php -q /home/[USERNAME]/public_html/app/Console/cake.php revenuemail -app /home/[USERNAME]/public_html/app
Groups are useful when you have multiple plans. You can create various revenue sharing plans and categorize them into groups. Groups can be created and managed from the "Groups" tab in the Revenue Sharing module.
- To Create Group
- Click on Add New
- Specify the Group Name in the box and click on Submit.
Please note that you will be able to see this module only if you have purchased it.
This is the name of your Revenue Sharing Module. The name of this module is what you have specified in the “Module Label” field while importing your module from Manage Module => Modules => Import Module
The label is also editable and you can edit it from the following page:
Go to Manage Module => Modules => Modules => Click on “Edit Module” => Edit the “Module Label” field
- Adding A New Plan
- Click on your Revenue Sharing module. You will find it on the top of your website.
- Click on the Revenue Plans tab. (or whatever you have specified in the module label while installing your module).
- Click on "Add New" button located on the right side. There will be 6 Steps as follows, which you need to specify :
- Step 1
- Group : Select the group in which you wish to place your plan. Select a group you have created or select "Default".
- Plan Status : There are two options for plan status :
- Active : Select Active if you want members to purchase positions of the plan.
- Inactive : If you select Inactive, then the plan will be inactive and members including old members would not be able to view it or purchase positions. In short, the plan would be closed completely.
- Purchase Status : There are two options for purchase status:
- Active : Select Active if you want new members to purchase positions.
- Inactive : Select Inactive if you do not want new members to purchase positions. But, members who have already purchased positions (old members) will continue to get earnings.
- Hide Plan? :
- No : Select No if you do not want to hide the plan and want members to view the plan on position purchase page.
- Yes : If you select Yes, then plan will not be displayed in the purchase page, but, it will be active. This is useful if you want to keep the plan as Supplementary/Parallel or it is useful if you want to test a plan without displaying it in the member's area. The direct link can be found at the end of the plan edit page once it is created.
- Allow Coupons on Purchase? :
- Yes : If Yes is selected, then members will be able to view the coupon code field (will be visible in the plan purchase page) so that they can use their coupons if they have any (active coupons).
- No : If No is selected, then the coupon code field will not be visible in the purchase page. Even if members will have coupons, then they will not be able to use them.
- Surfing Requirement :
- Required : If Required is selected, then members must surf either Biz Directory or Traffic Exchange as per the settings specified in the “Surf Ads Settings” or (Check Note below) in order to remain active in the plan and to get earnings.
- Note : To specify Biz Directory surfing settings, go to Settings => Advertisement Settings => Biz Directory => Surfing Ads Settings
To specify Traffic Exchange surfing settings, go to Settings => Advertisement Settings => Traffic Exchange => Surfing Ads Settings
- Note : To specify Biz Directory surfing settings, go to Settings => Advertisement Settings => Biz Directory => Surfing Ads Settings
- Not Required : If Not Required is selected, then members don't have to click on the surfing plans. They will be getting earnings without any restrictions.
- Required : If Required is selected, then members must surf either Biz Directory or Traffic Exchange as per the settings specified in the “Surf Ads Settings” or (Check Note below) in order to remain active in the plan and to get earnings.
- Plan Name :* Specify your Plan Name here. The Plan Name will be displayed on the Member Side while purchasing positions.
- Price Per Share($) :* Specify the Amount per Share which the members will have to pay while purchasing position(s) in this plan.
- Admin Profit(%) :* This is the amount the admin will get as a profit. It will be the percentage of investment amount that will be deducted from the Price Per Share. For example, if you specify 10% here and when a member invests $100, then $10 will be the Admin's Profit, which will not be shared with the members. Moreover, referral commission will also get deducted from the Price Per Share.
So, $100 (member investment) - $10 (admin profit) - referral commission = Amount shared among members - Payout Re-purchase/Compound Strategy (%) :* Specify the percentage of earnings that must be used for re-purchase purpose. Set 0, if you want members to withdraw the full amount earned.
For instance, if you set this to 40, then 40% of the earnings can be used only for re-purchase purpose while the remaining 60% of the earnings can be withdrawn. If set to 0 (zero), then members can withdraw full amount earned. The values are rounded to 2 precisions while calculating the amount as per the ratio.
- Step 1
- Step 2
- Maturity Amount (%) :*
- Regular : Specify the percentage of amount for maturity (ROI) here. For instance, let's say you specify 200% here. When a member purchases a share with $100, then his share will mature after earning $200.
- Membership Plan : Specify different return on investment (ROI in %) for different membership plans. Members will get ROI depending on the membership plan they have chosen.
Note:If there is no Membership Plan, then it is wise to create a Membership Plan first. You can create a Membership Plan from Settings => Membership Settings => “Add New". Once you create the Membership Plan, then come back to this page.
- Maximum Earning Limit (%) :* You can specify upper earnings cap members can get. Set this to 0 (Zero) if you want to allow this to be unlimited.
- Minimum Earning :* Specify the minimum amount or percentage of earnings members will get. There are two options for this :
- Percentage % : Specify the minimum earnings in percentage.
- Dollar $ : Specify the minimum earnings in amount.
- Note:
Please be very wise before setting any value here. Because if there is no revenue generated in the system and if you don’t have any funds, then you will still have to pay to the members.
- For Example : Let's say, after certain hours there is no revenue generated in the system and if you specify the Minimum Earning here, then members will still get the minimum percentage or amount specified above.
- Fixed Earning Time Span : This is when the minimum earnings will be distributed. This depends on whether the minimum earning is set or not. If you have not set minimum earning then there is no need to set this field. If the minimum earning is set, then you need to specify this. There are two options for this :
- As Per Cronjob : Minimum earnings will be distributed when the cronjob runs.
- Once A Day : Minimum earnings will be distributed one time in a day.
- Earning Credit Strategy : Specify the interval when you want to credit the earning amount in the member's account. There are 3 options for Earning Credit Strategy :
- Instantly : If you select Instantly, then the Earnings Amount credited will depend on the cronjob. If you have set the cronjob to 1 hr, then every hour the amount would be credited.
- Every 'n' Days : Specify after how many number of days you want the earnings amount to be credited. If You Set This to Every 'n' Days, Earning of Last Cycle Will Be Credited Upon Position Completion Even if The nth Day Has Not Arrived.
- On Position Completion : Earnings amount will be credited to member's account when the position is completed.
- Note 1 : All the above 3 options are based on cronjob. So, make sure that your cronjob settings are proper
- Note 2 : If you have selected the "Instantly" option above, then we highly recommend to set cronjob at every 1 hour. You can set it at every 1 hour interval but not less than this. Again, the cronjob time interval depends on your share amount and positions. The speed (performance) of the cronjob depends on your server configuration.
- If you want to set it at less than 1 hour, then make sure that your database size is small and server speed is good.
- Earnings Processor Preference : Select the preferred earnings processor here. There are two options for this :
- Purchase Processor : If Purchase Processor is selected, then members would get earnings in the processor they have purchased the position with.
- Priority Processor : If Priority Processor is selected, then members would get earnings in the processor that they have selected as their preferred processor in the Member's area. Priority Processor can be set from Member's profile and members can changed the priority processor from member's area.
- Pay Commission For The First Position Only : Select whether you want to give One-Time or Recurring Referral Commission to sponsor.
Select 'Yes' if you want to provide referral commission to sponsor one-time only. The commission will be given to sponsor for referral's purchase of first position only. Select 'No' if you want to offer Recurring referral commission to sponsor. - Referral Commission Re-purchase/Compound Strategy (%) :*Specify the percentage of Referral Commission that will go to Re-purchase balance. Members will need to make Re-purchase of whatever percentage you set here.
For instance, if a member gets $10 as referral commission and you specify 50 here, then 50% of $10 will go to the member’s re-purchase balance. So, he it will have $5 for withdrawal and $5 he will have as re-purchase balance. - Referral Commission (%) :* Specify the commission (in %) to be provided to the referral. You can specify the commission up to 10 levels.
- Dependent Plan(s) : This plan is to limit the purchase to some of the paid members only. It is mandatory that members have purchased position(s) of the dependent plan before they can purchase position(s) of the plan you are adding.
- No : Select "No" if you don't want to make it mandatory for members to purchase dependent plan in order to purchase the plan you are adding.
- Yes : Select "Yes" if you want to allow members to purchase this plan only if they have purchased a specific dependent plan. When you select "Yes", then you need to select the plan type and plan name of the dependent plan that members must purchase if they want to purchase positions in the plan you are adding.
- For Example : You have two plans, A and B. If A is the dependent plan for plan B, then members will need to purchase position(s) in plan A in order to purchase position(s) in plan B.
- Parallel Plan(s) : If admin wants to offer another plan (free or complementary plan) along with the plan being added, then choose Parallel Plan. Select yes if you want to offer a parallel plan and select the plan type and plan name that you wish to offer as a parallel plan.
- Note : If you are creating a revenue plan, let’s say “Plan 1” and if you keep “Plan 2” as a Parallel plan, then make sure that you do not make Plan 1 parallel plan of Plan 2, otherwise the loop will keep on running and will not complete.
- Supplementary Plan(s) : This plan can be offered to members when they complete positions of the plan you are adding. Whenever a member completes the cycle any of the position(s) of the plan being added, then he will be given the Supplementary Plan for free. Select "Yes" to offer Supplementary Plan to members and select the plan type and plan name that you wish to offer as a supplementary plan.
- NOTE : You can offer any plans from different modules for all Dependent, Parallel and Supplementary Plans.
- Maturity Amount (%) :*
- Step 3
- Maximum Positions a Member Can Purchase At a Time :* This is to set a limit to the maximum number of positions a member can purchase at once. Note that it is mandatory to specify a number here. Set this to 0 (Zero) if you want to allow this to be unlimited.
- Maximum Shares a Member Can Own :* This is to set a limit to the maximum number of positions/shares a member can own. Note that it is mandatory to specify a number here. Set this field to 0 (Zero) if you want members to purchase unlimited number of shares.
- Note : The system counts active positions only.
- Maximum Joinings :* This is to specify the maximum number of members who can purchase shares/positions in this plan. It is mandatory to specify a number here. Set this field to 0 (Zero) if you do not want to specify a limit to the number of members who can join/purchase positions this plan.
- Membership Required : Select "Yes" if you want only members with membership(s) to purchase positions in this plan. Please note that members would need only one of the required memberships to purchase position in this plan. Select "No" if you want all members including those who do not have membership(s) to purchase positions in this plan.
- Note : To set Membership, go to Settings => Membership Settings => Click on "Add New"
- Step 4
This is to offer advertisement plans such as Banner Ad Plans, Text Ad Plans, Solo Ad Plans, PPC Plans, PTC Plans, Login Ad Plans and Biz Directory Plans to members as complementary to members who purchase positions in this plan.- Banner Ad Plan : Select the Banner Ad Plan that you would like to award to the members as a complement who purchase position(s) in this plan.
- Text Ad Plan : Select the Text Ad Plan that you would like to award to the members as a complement who purchase position(s) in this plan.
- Solo Ad Plan : Select the Solo Ad Plan that you would like to award to the members as a complement who purchase position(s) in this plan.
- PPC Plan : Select the PPC Ad Plan that you would like to award to the members as a complement who purchase position(s) in this plan.
- PTC Plan : Select the PTC Ad Plan that you would like to award to the members as a complement who purchase position(s) in this plan.
- Login Ad Plan : Select the Login Ad Plan that you would like to award to the members as a complement who purchase position(s) in this plan.
- Biz Directory Plan : Select the Biz Directory Plan that you would like to award to the members as a complement who purchase position(s) in this plan.
- Website Credit Plan : Select the Website Directory Plan that you would like to award to the members as a complement who purchase position(s) in this plan.
- Step 5
- Payment Method: Admin can make settings to allow members to make payment from different wallets while purchasing a plan or advertisement pack. Admins can choose which wallet to be allowed for making payment while adding a plan from the following fields: The following payment methods/wallets are available:
Admins can choose which wallet to be allowed for making payment while adding a plan from the following field: - Payment Method :* Select the payment method/balance type that you want to allow members to purchase positions in this plan. At the moment, the following payment methods/wallets are available:
Cash, Re-purchase, Earning, Commission, Processor, Cash + Re-purchase, Cash + Earning, Cash + Commission, Re-purchase + Earning, Re-purchase + Earning, Re-purchase + Commission, Earning + Commission, Cash + Re-purchase + Earning, + Re-purchase + Earning + Commission, Earning + Commission + Cash, Commission + Cash + Re-purchase, Cash + Re-purchase + Earning + Commission
- NOTE : The payments methods/wallets displayed here will depend on what installation type you have chosen during script installation.
Also, the wallets will be checked and funds will be deducted sequence wise from the system. For instance, Re-purchase + Earning: System will check re-purchase wallet first and then earning wallet. Likewise for Cash + Re-purchase + Earning + Commission, funds will be deducted from Cash first, then Re-purchase, then Earning and lastly from Commission. - Allowed Payment Processors :* You can decide which processors can be used to purchase position(s) in this plan. Select the payment processor you want to allow members to purchase positions in this plan. There are many options for this :
Bank Wire, Payza, SolidTrustPay, OkPay, Perfect Money and many more.
There will be all the wallets available in the above, and admin can choose whichever he wants to allow.
When members purchase a plan, then the payment from the wallets will be deducted in the following sequence: cash, repurchase, commission, earning
For instance, let's say Member "A" has the following funds in his various wallets:
Cash - $10
Repurchase - $5
Commission - $7
Earning - $3
Now, let' say he purchases a plan worth $20. Then, first the amount of $10 would be deducted from Cash wallet, then $5 from Repurchase wallet and $5 from Commission wallet.
This is how it will work.
Balance Transfer - Internal transfer possible from balance to balance or processer to processor
Now members can transfer funds from various balances from one balance type to another and even from one processor to another.
- Payment Method: Admin can make settings to allow members to make payment from different wallets while purchasing a plan or advertisement pack. Admins can choose which wallet to be allowed for making payment while adding a plan from the following fields: The following payment methods/wallets are available:
- Step 6
- Admin Note : You can add an admin note here which will be displayed in the purchase page.
- Link : This is the link of your plan. You will get to see this link after you have added your plan and you can view it when you go to the edit your plan. You can edit your plan by going to the plan over view page, click on the "Action" button of the relevant plan. Click on edit and you will be able to view the link in the bottom of the page.
Finally, click on Submit to add your plan.
If you want to view the plan you have added then go to the Plan Overview page and click on the relevant group tab in which you have added the plan.
ID : This displays the ID of the revenue sharing plan added in the system
Plan Name : This displays the name of the revenue sharing plan added in the system
Price : This displays the price of each share in of the plan
Admin Profit : This displays the profit of the admin
Maturity : This displays the Return on Investment (ROI)
Credit On : This displays the credit strategy of the plan
Fund : This is very important. It displays the live statistics of the investment amount of the members that is currently in the system before the next cronjob runs. You will get to know the amount of fund that is going to be distributed on the next cronjob.
Action : You can edit, copy, inactivate plan, view plan members, delete plan positions, deny purchase positions and delete plan by clicking on this button.
- This displays the earnings that are distributed when the cronjob runs. You can search the log with the following parameters :
- Note : If recent log is missing, then it means that your cronjobs are not running properly. You need to make sure your cronjobs are running properly.
-
- Search By : You can search by Purchase Amount, Commission, Total Shares, Total Profit, Admin Profit, Shared ROI and Shares.
- Search For : Specify exactly what you want to search for corresponding to what you have selected in "Search By"
- From : Specify the starting date of the revenue share log you want to display.
- To: Specify the date till when you want to display the revenue share log.
- Displayed Records :
- Date : This shows the date and time when the cronjob ran. If you want to find out how much time your server is taking to run a particular cronjob, then you can know it from here.
- Plan : This displays the plan ID. When you mouse hover over the Plan number, then you will be able to view the plan name.
- Purchase Amount : This displays the total purchase amount of the plan from last cronjob to current cronjob.
- Commission : This displays the commission amount given to a member.
- Admin Profit : This displays the profit that the Admin received.
- Total Shares : This displays the total active number of shares that have to be given earnings.
- Total Profit : This displays the total profit of the plan after deduction of admin profit and commission from purchase amount. The total profit is the profit that will be shared among members (Member's Profit)
- Shared Amount : This displays the amount that was distributed among the members.
- Shares : This displays the earnings that were distributed to the number of shares.
- Pending ROI : This displays the pending return on investment that still has to be distributed to members. This amount will be carry forwarded on the next cronjob.
- ROI : This is the return on investment in terms of percentage